Mode dial: Which exposure mode should you use?
Your camera’s exposure mode dial is probably the most daunting of the controls on your camera — especially if you're new to photography.
If you can’t see the video above, you can watch it on YouTube: https://www.youtube.com/watch?v=liY2kT6QQcI
The mode dial is where you make exposure choices.
The word, exposure, or exposure value (Ev) is a photo term that describes the quantity of light, or brightness.In photography, exposure in your photo is controlled by three things:
f/stop – How big the lens opening is
Shutter Speed – The amount of time the shutter is open
ISO – The sensitivity value of the camera sensor, or film (read my blog post on ISO to learn more)
(adsbygoogle = window.adsbygoogle || []).push({});When you get your first adjustable camera there’s so much to learn, plus so many things to set up, you’re often unsure of which exposure mode to use.
You might get frustrated or confused and just keep your camera on one of the automatic modes.
As you become more experienced with photography you'll want to control things like freezing or blurring motion. Or you may need control how much of the photo is in focus.
And that’s where the mode dial comes in handy.
Here are some beginner tips about how to choose the perfect mode to shoot in.

Lumix-mode-dial


Nikon mode dial
First let’s do a review of what all the letters on that mode dial mean.
Explanation of each exposure mode:
iA = Intellgent Auto mode (Lumix cameras) and “Green” square on Canon – The camera controls all the exposure settings like ISO, White balance and if you need your flash, and all you have to do is compose your photos. Basically this turns your camera into a point and shoot.
P = Program mode – In program mode you choose the ISO and White balance. The exposure (the f/stop and shutter speed) is set automatically. You can rotate the exposure wheels and change the settings if you’re not happy with what the camera chooses, so there is some room for variation.
TV or S = Shutter Priority Tv stands for time value – In shutter priority mode, you choose the shutter speed you want, based on the look you want in your photo. The camera chooses the f/stop. Examples are freezing action or blurring action for creative effects.
Av or A = Aperture Priority Av stands for aperture value – In aperture priority mode, you choose the f/stop based on how much you want in focus. That’s also known as depth of field. In this mode the camera picks a shutter speed for you.
M = Manual mode – In manual exposure mode, you pick both the f/stop and shutter speed based on the amount of light in your scene.
M Video = Manual video mode – This is similar to manual photo mode where you pick the f/stop and shutter speed. Video shooting has specific guidelines for shutter speeds, usually related to the frame rate you’re shooting at. In general you don’t want to go much higher than 2x your frame rate.
Start with iA or P mode

mode dial easy
If you are totally new to photography, and you're un-boxing your first digital camera, start with one of the automatic modes such as, iA or Program Mode.
Use the auto modes for a few weeks.
Go on some photo walks and work on your composition and light.
When you get comfortable with how the camera feels in your hands, and understand a few more of the buttons and menus, you can move on to the other shooting modes.
But get really comfortable in the auto modes first.
After you're super comfortable with your camera, start using other modes – Shutter and Aperture priority.
You'll start to notice the limitations of the automatic modes when you try to do something like freeze action, or shoot with shallow depth of field. That's your clue that you're ready to move on.
Shutter priority

mode dial shutter priority
Put the camera on Shutter priority mode. Choose a shutter speed and the camera will pick a corresponding f/stop that will give good exposure. Shutter priority is still automatic, but it lets you choose the shutter speed, and that gives you creative control on how motion is captured.
Shoot some motion at a slow shutter speed and a fast shutter speed and see the difference.
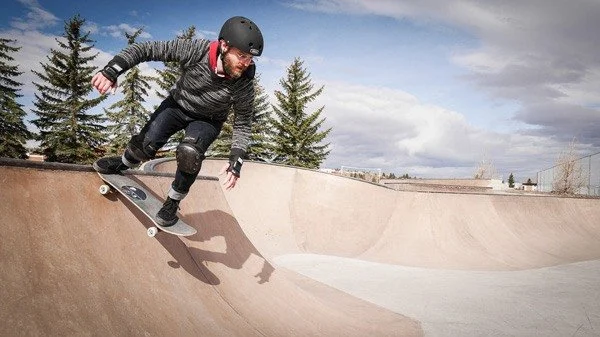
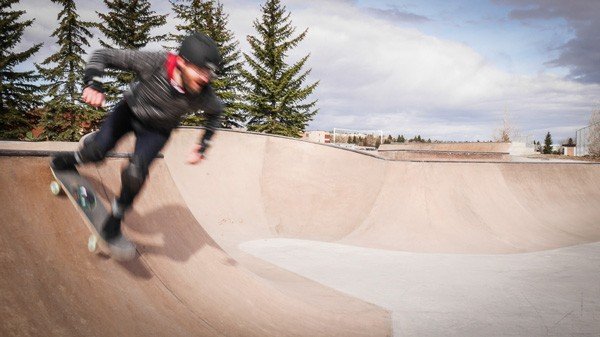
For example when I want to freeze the action at the skate park, I choose a shutter speed of 1/1000 second or faster.
If I want to blur the motion, I'll pick a shutter speed that is slower than the subject is moving.
There are all sorts of things you will learn along the way too, like the slowest shutter speed you can handhold your camera. So you might need a tripod, or mono-pod.
mode dial shutter priority fast
mode dial shutter priority slow
Here's a couple of examples:
Aperture priority

mode-dial-aperture-priority
Shoot the same scene with your camera lens set to the biggest f/stop and the smallest.
The camera will adjust the shutter speed for you, automatically.
Notice how less, or more of the scene is in focus when your f/stop is all the way open and on the smallest setting.

mode dial aperture
mode dial deep dof
Couple more exposure settings to know
This is a HUGE topic, but since we’re talking about exposure modes here, there are a couple of other camera menus that you need to learn about in order to control exposure – when you're ready!
They are ISO and Exposure Compensation:
I suggest you check out my blog posts and videos about Auto ISO, and the best ISO.
And to correct brightness, I've got a lesson on exposure compensation.